Friday, February 22, 2013

Diamond Tufted Bench

This is the next project to come.  I have stripped off (both layers of) the old upholstery.  Red velvet on top (yuck) and ancient brocade under.  The legs are a disaster and have to be finished in some way.  I envision a distressed rusty red for the very beautiful medallion print velvet I have for the upholstery.

Here is the very inauspicious beginning.


Believe it or not, there was actually a layer of dry-rotted foam rubber under that sad brocade upholstery.  Stay tuned.  This one is going to look so much better.

Well I went a different direction entirely, painting the legs terra cotta and upholstering in a handwriting embellished linen with tufting.


Chair of the Dog

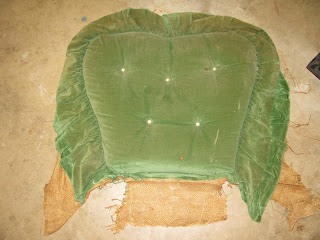
This chair was in my bedroom when I was little (circa 1962ish).  My mother covered it in emerald green velveteen and it has been that way since, stored away in her attic or wherever she could put it.  The foam inside was dry rotted and the fabric was stained and stinky.  Once I started deconstructing it, I decided I didn't want to put it back the way it was originally constructed.  We have some products now that were not available in the 1960s that make this type of upholstery much easier.  I'll show you.


This is the original fabric that came off.  It was made into a sort of a cushion with burlap on the back which was then tacked to the chair frame.  I don't know why this method was used but it doesn't make sense to me, so I part ways with the original chair right from the start.


The first thing to do is start clean.  The springs in this chair are a different kind of horizonal spring that is in great shape and doesn't need to be replaced.  I just needed to replace the rotted burlap that covered the springs.  (Another old coffee bag.)


I used a base of foam with cotton wadding over it, step by step layering until . . . . drumroll please . . . .

The Chair of THE Dog 


And here is the dog:


(I added height to the chair by using leg extenders that are intended to make it easier for elderly and handicapped people to get up and down.  They made the chair about 4" higher and the perfect height for my sewing table.
 

Martha Washington Table Reinvented

This table came from Freecycle.  I picked it up from a front porch in Burke, VA.  It's not a very nice example of this type of victorian sewing cabinet as it's made of oak or pine, but it's great for this purpose.  Sorry I didn't take a before picture because it was pretty ugly, but here is the little beauty now.
 
I rolled on a Behr paint color called Cayenne, replaced the wooden knobs with glass and lined the drawers with antique map paper.  It's adorable and gets more comments than anything else I've done so far.


The Coffee Chair

This poor chair suffered through life in a hoarder's house, then when I had a contractor in to do some tile work, they set a box of tiles (right?) on this antique chair and blew the springs right out the bottom of the frame.  I promise you that I didn't need to learn to tie springs at this point in my life, but thanks to YouTube, I got it done (with the help of my daughter).  You really can't do the springs alone.  My first couple of tries, they broke free from the cord and whacked me in the hands.  Not good.


I tried to get as many angles as I could so I would remember how to reconstruct this.  It was no use with the springs because they were hanging from cord out the bottom and had to be cut out and cleaned.  I sent the frame out to a local refinisher and got ready for the next step.  First time ever stretching webbing onto a chair frame.  Little did I know how many times I would use this knowledge.

What you also have to know is that every bit of this chair was covered in a fine dust/mold/decomposing fabric substance.  Every thing that was pulled off had to be disposed of immediately.  I couldn't cut a pattern from any of the fabrics.


And this is how she looks all cleaned up and webbed.  The webbing is applied with a stretcher so that it's extremely tight.  It's the foundation for springs, padding and upholstery.  If the webbing is loose the upholstery will just stretch and fall apart.  And below are the tied springs.


Here there is a bias cut burlap strip that encloses this 5/8" cording.  This helps keep the padding within the frame of the chair back.  Then everything is covered with burlap.  Now it's ready for a layer of coconut fiber, followed by cotton waddding, then covered with muslin or another layer of burlap before the outer fabric is applied.  This way you see that each step is smooth before you move on.


 And step by step, the cover is added until finally . . .


And here is why I call it my Coffee Chair


Thursday, July 19, 2012

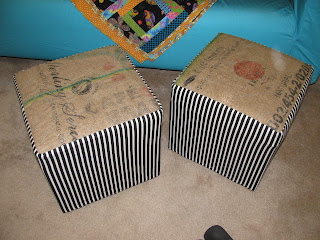
Cube Ottoman with coffee bag tops


After seeing so many creative uses for used burlap coffee bags, I've made my first project.  These cubes are Ikea's old, retired ottomans that used to have covers to match the Klippan sofa.  They have moved to a new type of ottoman, so I'm left to my own devices to cover these guys.  I'm very satisfied with this result.  The coffee bags have to be attached to a stable base for this use, since they must be durable.  I fused them to a quilt sandwich of muslin and batting, then quilted the whole stack.  I decided to wash the burlap first so that there wouldn't be a shrinkage problem with the finished product when it inevitably needs cleaning.  I lost a bit of the intensity of the paint stamps, but I think they look great.